
This is yet another post on how to make a silicone mold for resin casting. Except I didn’t do it all right and you can see how forgiving the process can be.
It all started with my first 3D print – a Boston Terrier from Thingiverse. After removing the supports, there was still some rough areas (like under the chin) that could probably be fixed with printing in a different orientation or different extruder settings.


I didn’t worry about that, and I probably should have spent a little more time sanding the model. I did try to use Magic Sculpt to fill the grain from the printing process. It did not work.
My mold making materials came from a Smooth-On kit intended for brushing over an original. This is usually demonstrated on a bust or similar item with a broad, flat base. Models like mine are usually placed in two part molds.
Having watched a video on that in the last two weeks, I didn’t let any of that stop me. I proceeded to “clay up” the model and poured silicone over it. After five hours, I removed the clay and cleaned the model and silicone. I also added a toothpick to each foot and the chin with a hot glue gun to serve as vents. I used a large straw as the pour hole.
At this point I made my biggest mistake. I rewatched the video and read a dozen other articles and found the next step was to spray everything with a mold release agent. Having none, I searched for alternatives. Folks talked about oil based ointments (Vaseline, Vicks, and similar) working as long as they weren’t too thick to leave marks. I decided to use a thinner oil – almond oil. I poured the second half of the silicone and waited overnight.
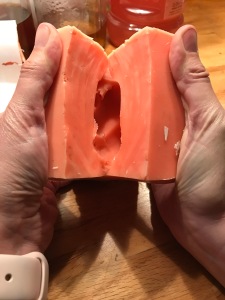
My alternative mold release failed miserably. I could only manage a slight separation at the edges. After spending most of the day pondering my mistake and options, I took a tomato knife with a long, serrated blade and started into the silicone. After starting a good groove, I had Mr. Man hold the sides open as I continued to slice. At about half way, I could see the model inside. It took the two adults with all hands to “birth” the model out of the sliced silicone.

With that done, I used rubber bands to hold the sliced half together and began pouring resin. My first cast had a problem with an air bubble at the chin. I had a vent there, but I left the mold flat. Subsequent casts were done with the head/chin on the downside of a slanted mold.
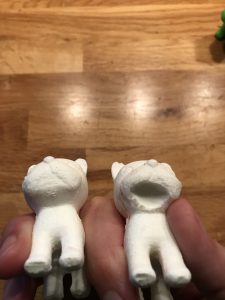

I also learned a decent way to estimate the resin needed for casting. I weighed a cast at 25 grams. I mixed 30 grams of resin (15 grams of part A and 15 grams of part B) to accommodate the sprue vents and pour hole. It worked perfectly. For what it’s worth, the 3D printed model weighed 23.5 grams.
